Holiday greetings everyone! So the holidays are coming up and I've been subbing more in the school district. What does that mean for my craft life? It's getting squished - but it's not gone! Attending sewing clubs and groups keeps me motivated to get at least one item finished per month. I like to blog each week so that's another motivation.
So this week, I worked on two more wallets. This time I added a trim to the flap. I used white and cream trim and I like them both the same. I still would like to put my "WizardGir1" logo tag inside. I think I'll have to hand sew them in.
And to keep myself away from food after dinner, I've picked up my crochet hook each night. I'm planning to crochet every night for the rest of my life. :) Okay, it's cool and I want to become really good at the craft. So I have to practice. If I am not crocheting, my other option is knitting or the treadmill! :)
These are coasters for my mother in law. I have no idea if she uses them, but I know she likes crocheted stuff. She crochets too, so I don't know if she'll like them that much. I'll find out.
We had a ton of snow come over the Twin Cities and the Minneapolis Metro dome caved in and then finally collapsed. We drove down to look at it before it collapsed. No photos of that, but I did see other things that were snapshot worthy! I thought the spare tire of this SUV was too cute to pass up. Click on the image if you can't see it that well.
Getting right into town.. there is this big brick guy on the rooftop. It's on the same block of the Utrecht art supplier that I shop at, so I see him at each visit. Isn't he just cute!?
Look how high the snow is! People were crawling over the mounds of snow all over the place. The snow doesn't seem to slow us down! The Old Spaghetti Factory is the best place to eat with it's fun ambiance. It has old cathedral stained glass windows inside. These are gigantic!
I thought this structure was neat to look at. I first noticed the heart pattern and then it drew my eye down the length of it. Some of the patterns look tribal to me. This is by the dome, btw.
That's it for me today. It wasn't too elaborate of an article, but I promised myself I would do this once a week. I have had an itch to play with Sculpey polymer clay so that's what I'm going to do. Of coarse I'll take photos to share. The dishes can wait! :)
Well I can't believe it. Another week flew by! When I looked at my planner this morning, I gasped when I realized it was blog day. I thought "Ah, WHAT AM I GOING TO BLOG ABOUT?!" Then I realized that even though I haven't been sewing this past week, I have been crafting. Yup, I sat down with my mom and we started an amiguruami frog pattern. From the research I did, "amiguruami" is Japanese style of crocheting in the round. Geez, it's a lot of fun! You gotta try it.
This guy is made of 100% acrylic worsted weight yarn - the color is "olive", Vanna's Choice from Lion Brand. His legs are the same brand of yarn, and I think "fern" is the color. He's just an adorably goofy looking froggy. The style of his pupils is my creative edge to give him a Kermit The Frog look about it. I stuffed him with poly fill that the local craft shops carry.
I also finished up my winter hat. When I began, I found extra yarn that I had in my stash - there were no labels on the skeins. After I finished, I realized that it was left over yarn from my felted purse project. It's 100% wool. Do you know what that means? I need to hand wash it unless I want to felt it for a baby! :) The skein is soft to the touch, but it's itchy on the head. Next hat I make will either be a blend or 100% acrylic. (I love acrylic!)
When I went to quilting group on Saturday, I learned that my "Flying Geese" ruler doesn't make 2 ½ X 4 ½ blocks, (it makes 2 ¼ x 4 ½) which is the size I need for my table runner project. Needless to say, I didn't work on my quilt project. I'll have to cut strips manually and piece it together. I also need to work a little more on my art doll. I set her aside after I finished her skirt. Like I've mentioned before, I need to get new lace to be excited for the next step. :)
Okay, it's been a week and do I have a treat for you! Well, maybe the treat is more for me, but I think you'll like it, maybe not as much. Sooo, I finished my Victorian Ruffled Afghan! Woohoo! And here's a little story.
I didn't want to complete the entire 4" ruffle around the squares because I thought it would take away from the look I wanted. I wanted a smaller ruffle, just an added softness. So here is a photo of that.
Now ON TO SEWING! This blog entry is really about ruffles and gathers. The afghan had them and now my doll's clothes has them - all over the place! All right, let me interject something here...
So, I'm broke. I'm always broke. Even when I have money, I'm broke. I don't like spending money frivolously. This isn't a bad thing - I've come to realize. It really pushes me to be more creative. I wouldn't classify myself as a lazy person; I'm efficient. My point to this interjection is that if I can get a ruffle for my dress without spending the time it takes to run to the store, match up the fabrics, pay the money and then come home again, I will. I creatively made this ruffle for my doll dress!
First, I sewed 3" wide strips of fabric that equalled the length of two yards. I finished the raw edge of the maroon fabric with my serger, but this can be done with the zigzag stitch and look quite decorative. A cording foot could also be used to finish the edge in a cute fashion. I used crochet thread in my lower looper to achieve the look in the following photo. Then I ran the fabric through my ruffler foot.
Here's a video on how to make a ruffle using the ruffler foot. (I know how everyone likes videos and my last one went over quite nicely! Thanks for watching. Hopefully is was entertaining at the very least. I'll also add the Ruffler Foot video to the "videos" tab.) I purchased my foot from the local fabric store - it wasn't a special order and if you have a 40% off coupon, use it!) I feel a tad awkward making a video but I hope you can follow it with ease. I am not a ham. :)
After I made the ruffle, I added some vintage lace. Even though the light blue color doesn't match exactly, I liked the look it gave to the skirt. I strategically pinned the ruffle and the lace to the skirt fabric so I could sew them both on at the same time. Remember, I'm efficient! :D
I carefully sewed the lace onto the skirt. I went as slow as I needed to in order to get a nice straight stitch.
This was a new method for me to gather my doll's skirt waist. I used a very long strand of crochet thread and zigzagged over it using invisible thread/nylon thread.
After I finished with the gathering cord, I firmly held the tails and eased the fabric into the gathers that I wanted. I used a doll making needle to pull the threads to the front of the doll. I plan on adding beads to the stands and tying it in a bow. I think it will look cute!
Some of you know that I've taken a little over a month to go through some rooms in my home to clean out the clutter. Well, today is the day for the Lupus Foundation to pick it up! Here's the first shipment. Among the lot is a nice vintage Christmas tree. I thought it was perfect timing and someone could have a new tree this year. It's quite nice, but I'm downsizing, cleaning out clutter and creating an easy way of life for me and my husband. Last year, I bought a short Christmas tree that sits on a table. Hopefully, I can find a table the right size to set up in front of our living room window.
Back to the doll for a quick second. I'm not too pleased with the lace I have for the doll's apron, but I might make it work. I don't know yet. I'd like to make a pair of pants soon and I might pick up some lace that I like more when I make a trip to the fabric shop. I crocheted a winter cap and I have to make a flower for it yet too. Photos of that will come soon. I wanted to finish it first. My Sweetie liked my cap so much that he requested one for Christmas! That made me feel good!
It's time for me to close. I'm going to begin my day. I've spent more time here than I intended - how efficient is that?? :P
I know that I have mentioned a couple of times that I want to get a stuffed bunny going, but my heart wasn't into it when I started it this weekend. I folded my cut pattern pieces and put them in a large plastic envelop to store it until I want to begin the bunny again.
So if my heart wasn't into the bunny, what was my heart into? A doll. But not just any doll - a cloth doll. But not just any cloth doll, not like the Sophie doll I started a year ago. The doll project I started this week is an Art Cloth Doll! My goal is to see how elaborate I can make the details. I want fine detail - makeup, jewelry, painted nails and beautiful lace trimmings! Okay, this all a goal - something for me to work towards. I think I've found my niche.
I've wanted to make an art cloth doll for over a year. I used to rent the books from the library often and just drool over the work people have put into making these! They are so cool! I've started storing the littlest scraps of neat and unusual fabrics and beads so I could decorate nicely when the time came. The time is almost here. I'm in the process of constructing the doll body. I don't have a name for her yet, but I will share it when it solidifies. Here she is in pieces.
There is quite a bit of hand sewing. I am learning to enjoy it. More detail work!
To make the elbow, you draw a thread from seam to opposite seam tightly to squish the elbow and then wrap your thread around it a few times. The floral fabric shown here is her bodice.
Her fingers have been stuffed and defined by the stitching between them. I did one of her hands by hand sewing and the other by machine. The machine worked hand turned out better. The stitching was tighter which created a fuller finger form. :) These little fingers will be painted as a finishing touch. :D
I'm using Cloth Doll Artistry to learn how to make my own art doll. If this doll is enjoyable enough for me, I just may become a "doll maker" in my spare time! :) I've asked my ma to set up another sew day with me. She's working on kitchen curtains - country house style. Hopefully I will get to work on the doll a little more this week! If not, I will make time this weekend for sure!
All right! My mom accepted the sew day invite and we stitched to our hearts content! We made Little Wallets by Valori Wells Designs. It was so much fun to put these little cuties together.
The directions on the card said to trace the patterns to make templates, so that's what I did. I used card stock for the template material.
The card stock makes a nice firm edge to trace around. We needed 2 of each pattern template.
My mom chose a beautiful holiday fabric, while I chose a pretty rose patterned fabric.
Here is an image of the layout before we sew it all together. We were instructed to sew the pockets and then turn and press them to get a nice edge in the wallet.
This is the Little Wallet after everything is sewn together!
My mom had decided to use a decorative stitch so I wanted to also. Her stitch mimicked the pine tree bristle really well. I used the same principle in choosing my decorative stitch. I used a rounded leaf.
I'm not quite sure what I will sew up next, but I do have my bunny pattern cut out for a stuffed bunny. Time has been holding me back on that project. I'm still trying to go through stuff in the house to donate it. November 30th will come up quickly now, so I want to focus on getting that done. I'm hoping to make a good dent at the very least. :) Maybe I can make time for a small sewing project. :D
Okay! It's been 1 week since I last posted. This planner thing is keeping me going strong. I must be a planner - 'cept when it comes to fitness and food!! LOL
I have been sewing, but not with woven or knitted fabrics. I pulled out my crocheted Afghan squares that took me two winters to complete (150 squares total). Last year I was hung up on the "whip stitch" that I was supposed to use to connect the squares, but this is what I finally decided to do, if you can make it out from the photograph. The blanket is not for a competition, so I did what would work best for me. :)
Here's the Afghan spread out over our sofa, so you can see that it's not too large. It's not completed as you can see - still need to sew the rows together and make the ruffle border. I think the directions said the finished size was 40" X 60". I'm sure the kitty will take it over unless I keep it in our bedroom. I loved the colors of the Afghan in the book, so that's why I went with this pallet, but I don't decorate in these colors. It's just going to be random throw that I love. It's a really soft yarn. :)
I haven't been feeling the best. This is day 3 with a sore throat, but it hasn't gone to my head or chest. It's just lingering. I do plan on drinking herbal tea several times today and hopefully a walk. I have energy for it. YAY! I've invited my ma over for a sew day - we have purchased fabric to make cute little card wallets. We picked up the pattern from Bear Patch Quilting in White Bear Lake, MN. I haven't heard back from her, but I invited her to come over on Friday. That means I'll have another project to post next week! I have a gorgeous rose patterned fabric that I'm so excited to use!
★★★ Okay, I had to post this! I finished sewing the last two columns on. Now, ON TO THE BORDER!!! Laura suggested I take a shade of brown in. :) I am leaning towards that color myself.
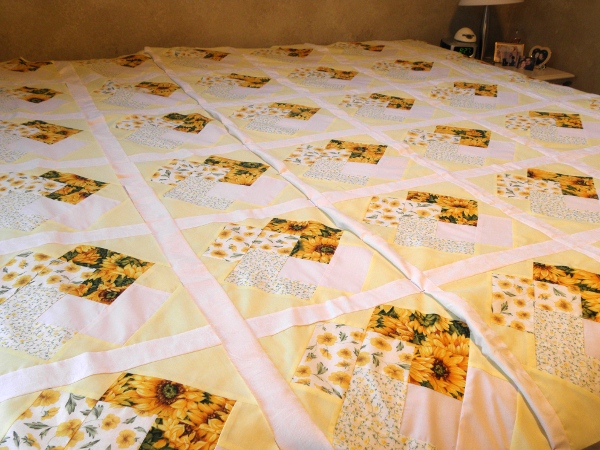
★★★ This past week I've been stitching away at my king size quilt. I am not even half-way done at this point-the point where I've left off. If you remember, I had to sew on these annoying little triangles before I could sew the lattice to the block. Here are the finished blocks with all of their yellow triangles. I wanted to lay out all the blocks so I could see my most crappy sewing and then hide it (by rearranging square layout) as best that I could.
Well after 100 triangles or so, it was time for the lattice strips. At this point, I'm beginning to see how it will come together nicely.
And this last photo is where I've left off. Argh! I have two more columns to sew together before I can begin my border. I'm starting to love it, love it, love it. It looks fancier than I intended.
I watched Sewing With Nancy today and I had an idea to pintuck my first border. To do this, I'll need a piece of border fabric twice as long as the original length. I haven't decided for sure. It's taken me 15 years to get around to this and I might just want to get it done--no more fussing! I have to buy a border fabric and I'm not sure what color to choose. I have a small pallet to choose from: yellow, white, green, and brown. I'm tired of green, but a light shade of brown might look nice. Our carpeting has brown flecks in it. :) I'll have to finish the step I am on before I can make decisions. Any suggestions?
That's all for now.
Until next week...★★★
10/27/10
★★★ I'm still learning! In my most recent sewing class, we learned how to use a 3-way cording foot to make a coaster: "Mug Rugs". They were a lot of fun to make, although it did take time. I began making a video on my Olympus but 2 seconds in to the video, the camera ran out of memory. I do plan on trying it again on the Sony video camera. Here's a photo-shot of my foot in action. Basically, you keep seaming in a square, but always seaming the entire 4 inches. We used Aqua Magic for our stabilizer; it washes away with water. It's SO COOL!
After you've completed your square, there will be loops to cut. You can see some of my loops forming in the photo above. I combed my cut loops so I could measure and trim for a more tidy look. I didn't read how short to trim it, but I thought an inch looked good. :) Here it is finished.
Moving on: The most recent project I completed is this cute organizer for my planner. (Using a planner is an old system that worked well in my past, and I've started using one again.) I wanted to apply what I learned with the cording foot to this project.
The cording is the bottom trim (sewed with a decorative stitch) and and I added another decorative stitch just to see how it looked. :) I like seeing what my machine can do!
I added a gold cord between the two fabrics, but it's hard to see. I used a regular zigzag stitch to keep that in place. I have been watching Sewing With Nancy on Twin Cities Public Television 3 days a week. This week I learned how to use my zigzag stitch as an appliqué stitch too. I attached the elastic pencil holder using that method.
I need pockets - lots of 'em! This one is for my cards.
And of course I have to have a pocket for all of my craft coupons and other notes I might need to take. And that's it! It was nice to not follow a pattern so I could use my mind to come up with design ideas. I like practicing my decorative stitches.
And yet another project: I made some place mats over the weekend too. These aren't quilted or batted. They would work well for bed night stands, especially since I made only two. :P My corners are perfect. I used a tool that is designed to give me perfect corners every time. It's called Sewing Revolution Double Mitre Ruler. Made in the USA. I learned about this ruler in my sewing class too! Thank God for my sewing class!
I think my next project will be a bunny doll. I've already started cutting out the pattern pieces for it. I saw some 5 3/4" lace trim last night at Joanne's Crafts that I might be able to incorporate into the petticoat or something. Joanne's has a crazy sale going on with items being 50% off. I should pick up that lace pronto. OH! (Changing the subject here) I saw cute tiny sequins/lills pins while I was picking out my appliqué pins. I've never used them for sequins, but I bought them so I could try it. I like the detail work. I'm going to have to get a new book now! :P
All right, I've written a "blog" day in my planner each week to help me stay on top of it. So, now I can say "Until next week..." as my closing. So...
This morning I have sewing club in Champlain, MN. Our instruction is to bring 4 yards of 3 different color decorative yarns and our sewing machine. We're making coasters and I have absolutely no idea what the heck we're doing. It interests me somewhat, but it's not an overwhelming interest.
What does interest me is my latest project. My sweet Salmon Kitty! She is too cute.
Kitty front-view
Kitty rear-view
Kitty features... I decided on a light nose because my kitty Fiona has a light nose, although it's pink not white! :) The features are cut from synthetic woolen felt. I decided to glue the features on instead of a fancy hand stitch. Of course, the whiskers and eyelashes are embroidery thread, not felt.
This kitty was easy to whip up. The directions are just as easy as making chocolate milk! :) I used Simplicity 2613 for the pattern. I'm also going to make the elephant.
I'm going to scoot off. Sewing With Nancy plays on TPT (channel 17 if you're in the Twin Cities) at 7 am and I've kept in habit watching it on Mon, Wed and Fridays, as those are the only days she is on air. :)
I have had an itch for a couple days to sit down and write again. When I arrived here, I was reminded that it's been 9 days again (Thanks Laura!!). I can't believe how time flies. One of my new hobbies lately is to sit at the computer for at least an hour at a pop and research sewing machines. (That's where the time goes!) I was starting to lose hope in the Kenmore I sent in to have fixed. I thought for sure I screwed it up bad because I have a tendency to be really hard on things. Nothin' delicate about me! I dig in full force! Well anyways, I got a call two days ago that my Kenmore was back in MN and I picked it up. The only thing wrong with it was the bobbin tension and timing. I thought for sure I messed up the gears somehow. HAHA! (That's why I've been reasearching new machines. Well that, and I want a new one "just because".) I started to sew up a table runner in beautiful blues last night and it runs like a dream again. I will mention though, that I messed with the bobbin before I started my project. I'm PICKY ABOUT MY TENSION! It may be my weakness as a seamstress. Hah.
I'll move on. I learned how to sew this table runner in my serger class.
The desk it is displayed on is my old sewing desk. It's around 70 years old and I love it!
This next photo is a result of a day's worth of work! I went through all of the fabric my new friend at work gave to me. I measured it and separated it into their piles. When I was finished folding and organizing, I counted the yardage: 70+ yards! Woohoo! What a blessing. The table runner that I'm working on is from that stash. She has excellent taste in fabrics! (A photo of the table runner will be posted as soon as I finish it.)
I don't know if any of you remember that I made some cupcakes out of polymer clay a long while back. I just couldn't stop making them after I got started. HAH! They are too cute. I wear them for earrings and people just love them. So do children, little girls especially!
So, my husband was impressed with these cute little miniatures and encouraged me (repeatedly for days!) to make pumpkins for the season. I finally set my stuff up and made them and they turned out adorable! I even made little vines for them. Cute, cute, cute! They will be used as earrings, pendants and charms. They were a lot of fun to put together. My last step is to polish and varnish them, then put on the findings. :)
My mom and I have planned to go to a craft show in Blaine, MN today. Oh, a handful of women from work are also going to meet us there. It will be so fun! Apparently, this is the only show of it's kind for crafters to make as much money as they do in the state. I'm not going to spend money though - I'm going for ideas and to compare my craftmanship! Shhh...:)
Doh! The last time I wrote was 9 days ago! I've said this before. I always have intentions of writing each week, but that isn't realistic for me at times.
As some of you already know, I have had some big ideas and some really big ideas as of late. I'm getting my cute little ducks lined up in a row because I like things to operate smoothly when it comes to implementing my ideas.
First off, I met a friend at work who is a quilter, Evie. It's torture for me to not completely blab about sewing while I'm on the clock! She's been quilting for around 20 years and had accumulated a little stash of fabrics that she has tried to get rid of - she's cleanin' house! Well, I gladly took that extra stash off her hands. :) I thought a basket of fresh veggies from our garden would be a nice "thank you". I stitched this dish towel up on the Kenmore 19233 and it rode "shotgun" on our journey to Evie's. :D She liked the basket of vegetables! She'd mentioned taking a photo of them, and I told her that I did!
So with some of the fabric stash, I worked on sewing up a cosmetic bag. I started with a pattern from Sew Pretty Homestyle and decided that I didn't care for the construction of the bag. I adjusted the pattern for cleaner construction. This is what I have come up with.
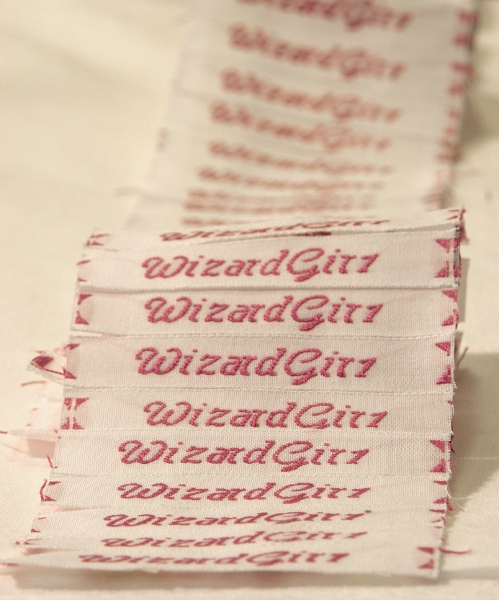
The day before my birthday, my "WizardGir1" labels arrived in the mail! I will now start adding labels to my finished items. :) I'm quite pleased with the way they turned out. You can definitely tell that the last letter is a number one and not the letter "L".
For my birthday, Evie gave me this beautiful Croton plant! I'd mentioned to her that my Croton wasn't doing so well and it's a bummer because the foliage is so gorgeous with color variegation.
My husband, Ed, bought me a Nikon for my birthday! I love the grape color. This is such a great gift for me because I always say "where's my camera!" when we are out and about and I see something snapshot worthy. This little baby fits right in my pocket! Woohoo! (I took the photo of the Croton plant with it.)
We had a frost a couple nights ago, so I figured that I should get out to the garden and harvest all that I could of our vegetables. These are quite the carrots! They didn't do this well last year. Never overwater your carrots - that causes those ugly cracks!
When I was harvesting the week before, I came across this little guy. It's going to be a Swallowtail butterfly, but I'm not sure which one. I have an easy laminated guide I use to determine caterpillar varieties. :) I'm not only a shutter-bug, I'm a "bug-bug" too! What a pretty caterpillar.
Well, there's a little introduction to my big ideas, and what I've been up to since I've last posted an entry. I still have some more duckies to line up before I can unveil anything further than this. Things take time. :) Until my next post...


