Showing posts with label sewing. Show all posts

5/23/11

Gluten-Free Bars & The Abbey Bag

Hello again Friends and Family. :)

I thought I would try and get a post before 7 days have passed, but it didn't work out that way this time. But I did better than 12 days! Thanks for coming back!!!

I'll just mention that my time at the doctor on Friday was a good meeting. I feel like she paid attention to my plight. She sent me to the lab to draw several viles of blood. We're starting with checking my vitamin levels and cholesterol and other stuff. After I get results back, we go from there.

In the meantime, she's encouraged me to venture into the gluten-free diet. I've been as gluten-free as I can get for 4 days. I still learn a little more each day. I have even made a trip of the health food store to get ingredients for a new way of baking. I stopped at the library and got some gluten-free cookbooks. I browsed my personal collection first and tried a recipe. This is my first purposefully gluten-free baked dish - Pecan Shortbread Bars. My husband LOVED them. Directly out of the oven, they crumbled as I cut them. I put the lid on after they cooled and about an hour or so later, they cut nicely. Ed thought they needed to "rest" a little before cutting. Perhaps so. Here's the recipe I used:

Gluten-Free Home Made Pecan Shortbread Bars
  • 1 cup softened butter
  • 1 cup sugar
  • 1 egg
  • 1 cup fine white rice flour {(next time I'll try the brown rice flour, as it is more nutritious.}
  • 1 cup tapioca flour
  • 3/4 tsp almond extract {I ran out of vanilla}
  • 1 tsp cinnamon
  • 1 tsp salt
  • 4 tsp xanthum gum
  • 1 cup chopped pecans {I used 1 and 1/2 cups. :)}

Directions: Heat oven to 350°. Grease 9"x13" pan. Cream butter and sugar. Beat in egg. Add flour, cinnamon, salt, and vanilla. Mix well. Stir in 1/2 cup pecans {I added the entire cup}. Press dough in bottom of pan. Sprinkle last of pecans over the bars and press lightly. Bake 30 to 35 minutes. Makes 32 bars.

Here's how mine turned out. Delicious! They were great with ice cream too! :) Okay, enough of baking.


On to sewing! Here's the wallet I made to match my tote. I added a pearl snap closure. I took the photo before I added that though... isn't it cutsie?! {I just realized that I haven't photographed my tote yet!}


Of course I have to share a picture of my new used sewing machine. It sews a little to the left of the foot, so I have to pay attention when I follow a drawn line. I do like the clanking of the mechanical machines. I'm thinking about decorating it with some glittery beads or something. I didn't spend a ton of money on it and I feel like I have a license to DECORATE now! :)


And you might remember that I am making a Sunbonnet Sue quilt with my mom. Here are some of my blocks.  I plan on appliquéing other cutsie stuff on the blocks with her, for example, stars, hearts and little critters. That's why some of their heads and hands are placed differently.   My favorite Sue is the one with the dark pink hat on.


I'm also working on a "Thread Catcher". This pattern is The Abbey Bag.


I found some emery sand at Northern Tool and Equipment. It's not called emery sand for sand-blasters. They call it Aluminium-oxide. :) It's mostly made from the material called Corundum {a stone?} and other particles are added. It's actually quite expensive. It's more expensive than I had originally planned for, but I wanted it badly, so I purchased it. Now I can make gifts with it. 


Here's the bag part. I'm practicing my blanket stitch for my Sunbonnets. =D


I'll finish this up tonight, I think. It was fun to make. I feel like I can tackle more time consuming projects if I work on them in mini-sessions. I've been working on this pin cushion for two weeks, maybe...? I see the light at the end of the tunnel!

Well, that's all I have for today. Thanks for hanging in there with me! More Sunbonnets to come later. I'm also working on a different owl pin cushion with fabrics that are similar colors to my Abbey Bag. Oh, and I suppose I will be sharing a little more gluten-free recipes as I experience new ones. If you know of great gluten-free links, please leave them for me. I like the "tried and true" links. :)

Have a wonderful rest of the week everyone. See you again soon!

5/15/11

Sunbonnet Sue Lap Quilt

Hi Friends!

I'm so sorry that it's been 12 days since my last post. I just haven't been feeling well at all. I've had such low energy that I find myself resting a majority of my days. I've had my thyroid checked and all is well there. I just don't know what my problem could be! I've gotta start at square one and find out. I'm going in for a physical this Friday with a new doctor. At any rate, when I do feel a tinge of extra energy, I push to get a craft started or finished rather than blog. Please hang in there with me. :)

I finished my tote and I'll be sure to post photos of it. I also made a matching wallet that is just so fun! I've continued hand quilting my king size quilt and still find hand sewing very relaxing.

Another project that I began was my Sunbonnet Sue lap quilt! It's a mother-daughter project, which means MY MOM IS QUILTING! She hasn't quilted in over 15 years so this is a big deal. I'll share photos of her Sunbonnets as soon as she gets them up and going. We're learning a technique from Eleanor Burns that utilizes lightweight fusible interfacing as an aid for the appliqué to bond it before hand or machine stitching. I took some videos of my work today to share the technique. It's extremely fun and the results are just neato!

I don't know how to operate a movie making program yet, so I have two movies instead of one. My camera battery died. So SORRY! I hope you enjoy them anyways. :)

Without further delay: Sunbonnet Sue Arm and Hand Part 1


Sunbonnet Sue Arm and Hand Part 2


Thanks for watching and see you again soon!

5/3/11

New Quilt Brings Other New Projects To Mind

Greetings!

It's been 9 days since I last blogged. That's better than 14 days, but I promise to get back on a weekly routine. Summer is barely making its way here and it's slightly depressing. I keep pushing forward though. I've had a lot of energy for crafting, which is great!

Well, first off, I'd like to share a quilt. My sweet husband and I have decided to use a quilt that his grandmother made for him for our king size bed. It was brand-spankin' new. Never been used. As a matter of fact, it still has the chalk marks on it from her hand quilting. :) So, what does having a new quilt really mean? This means that I get to decorate our bedroom in all new colors! I get to sew new table toppers and curtains and pillow shams! I haven't decided which color I want to use from the quilt (in the photograph below) but I have time to decide.


Since my yellow quilt lost its place in the master bedroom, it is going to be a lonely spare in the house. I've decided to hand quilt this. I couldn't find a template I liked, so I drew up my own. I made a large flower for the center of each block and a small flower for the cross-road on the lattice (in the photo below- upper left). I will start hand quilting sometime this week, I'm sure. I think having an extra quilt on hand will be nice. I'm actually in love with the yellow lonely quilt now. I added a brown border - which I will photograph and post later - and I fell in love. It's such a pretty, pretty quilt!


Moving on... more hand sewing. This embroidery business has me addicted. Or maybe it's the hand sewing. There is nothing like it to bring me relaxation. I love using my hands and eyes together with fine detail. The results amaze me. Now this next photo is of the Kitchenaid cover I made. This was one of the most simple projects that I've completed in my life! A basic embroidery image of a Kitchenaid makes this cover just a little more fancy. I don't think I'll ever get tired of it. :) The side panels are cherries. I might have put a little more thought into the way the cherries are floating because they aren't floating the right way. =o)  I'll remember that for next time. This type of mistake is what sewing is all about!


Random topic change coming now. Last night my girlfriend came over and we worked on making her garters for her wedding. She's asked me to help her with a variety of crafts - even stuff I've never done - and we've been successful thus far. She keeps asking me for more help. I'm so glad I am able to. All right, here comes another random topic change.


I'm not very smooth or fluent in my writing today. I suppose I would be a little more so if I were giving a tutorial of some sort. At any rate, here's my next project (next photo). :) I'm making a cute zippered tote. I like the tote in the pattern that has yellow and green stripes, so that's the one I'm starting with. My fabric is cheery light green with white polk-a-dots. The pocket fabric is this crazy bright teal with butterflies-all-over-it fabric (photo comes later). My girlfriend saw it and said "Yeah, that's Tawnya fabric." That comment made me smile.


Sorry for being sporadic or random. I have a lot of projects starting/finishing and wanted to get that all out on the table. (Which reminds me that I need to finish my crocheted white ruffle scarf.) My next post might be just as random if I can finish several projects. Time will tell...

Until next time, have a great week!

4/24/11

a Cherry on Top - Embroidery Fever!

Good evening everyone - Happy Easter! :)

I made time to craft this weekend. It was much needed. I've been thinking that I want something to do later in the evening that won't take so much brain power but serves as a creative outlet just the same. I have always wanted to work on my embroidery skills; I began at www.colonialpatterns.com to see what was available online. I've seen the Aunt Martha's patterns ALL over, so I thought I'd just go to their home site.

{* As a side note here - they are an American family owned business. Support them! They sent me two messages letting me know how much they appreciate my support for their business. They are incredible. I had my order in two days and they also threw in a free transfer pattern: Rock'n & Roll'n. :) They went the extra mile, so I thought I'd share and go my mile.}

For my project. I started on a dish towel using a design from Kitch'n Stitch'n. {I love the toast and the teapots -argh, so fun!}


I cut out the design I wanted from the sheet {I think it was 18" x 24"}. I heated my fabric up before I placed the transfer on it. I pressed it for about 5 seconds. Each transfer can be used several times.


A color chart comes inside the "Stitchers Revolution" line of transfers. I LOVED IT! If you look at the bottom of the chart, there are blocks of color names that they suggest. How easy is that? Yeah, I don't have to think. Love It!!


I picked the colors from my floss box that matched most closely to the color chart that came in the package.


OH! You'll need needles. I picked these up at Millie P's quilt shop in downtown Anoka, MN. {I want to visit the Mary Arden website.} I used one of these. I didn't see how they were any more special then the Dritz needles I've used previously. I guess I just wanted to try something new.


I also purchased a plastic hoop. Hoopity, hoop! I like the wooden ones better. This one became heavy on for my thumb to hold up. I eventually switched to a smaller wooden one. :)


Look at what my mom got me for Easter - BUNNY EMBROIDERY SCISSORS! CUTE adorable, FUN and CUTE! ...did I mention how cute they are? {I sort of have a thing for scissors. I love to look at all the pretty colors and creative designs. I know I'll have a million pair when I die.}


Okay, here's me starting to stitch. I started from the right and worked left, for no reason. I just wanted to.


Fiona wanted to sit on my left, for no reason. Just kidding, she wanted to lay on the heating pad that I had on my lap under my needle work, which she eventually shoved her way onto. LOL


Here's the finished wordage for the dish towel.


And here's the completed project. I worked on this on and off all day yesterday. Today I ran out and got some fabric to make a Kitchenaid cover. I downloaded and printed off the patter for that yesterday too. Ooo, that reminds me now, I need to get that in the dryer after posting this.


That's it for the embroidery project. Here's the last bit of my cutsie tote. I hand stitched the velcro band down. I'm so glad I chose to do it that way. You just can't get such a nice look if you use a machine. I guess "each to their own". I have come to learn that I really like hand sewing.


This next photo? I couldn't remember if I shared my idea on what to do with extra fabric on this blog. I drew up my own teddy bear pattern about a year ago and when I have extra fabric, I make these cute little bears! Today I had the great idea to draw up an owl pattern. They are really trendy right now and I've been bitten by the love-owls-bug. I can't seem to get enough of them. I run google searches just to look at them - tons of them! I'll show ya what I make when the times comes.


Thanks for reading today. I hope I encouraged someone to pick up an easy no-brainer embroidery project. If you get going strong and finish, please take a photo and show me! ---especially if it's of OWLS! :D

Until next week - have a good one!

4/16/11

Tabel Runner, Tote, Chinese Lampwork Beads

Hi Everyone... I'm sorry for the two week lag. Yeah, tomorrow it'll be two weeks since I've blogged.

In my previous entry I mentioned that I started cutting and sewing the "Butterfly Trail" blocks for a table runner. I managed to get them pieced together. I trimmed the topper and this is the semi-finished look. I still haven't decided if I want to hand or machine quilt it yet. I'd like to make a black top stitch along the inside of the light pink triangles and use a light pink thread along the darker triangles. I still have to put more thought into it. Overall, I'm very pleased with my work. My points look great! I just might put this one up for sale. While I'm taking time to think...


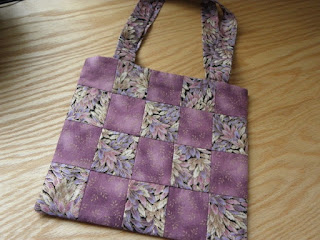
I've almost finished up a tote. I think these colors are so beautiful together. The purple with small print has dainty gold leave flecks that I just can't get over. I quilted the top with gold metallic thread on the purple fabric and then I used an invisible thread on the floral pattern. I sewed a hook and loop closure instead of a zipper. I have to sew the inside flap down and I plan to hand sew that.


Here's the patchwork on the back side of the tote. The straps are long enough to pull over your shoulder with just a little ease for movement. I didn't want disproportional looking tote handles.


This tote is also tagged! "WizardGir1". I think it's a nice finishing touch. :)


Moving on...  I know that I'm not the biggest fan of quilting, but the tote project and the runner has encouraged me to make a small quilt. (DOH! I'm not even finished with my king size "Winning Hand" quilt yet. More on that at a later entry, as I have the border strips cut and ready to sew!)

This photo is of an Amish design. The pattern explained that the Pennsylvania Amish folks (a.k.a. Pennsylvania Dutch) didn't use bright yellow, orange, or yellow-green in their quilts. The neutral color used was black. I have always LOVED Amish quilts. I think they are so clean and easily read (they aren't busy with fabric colors and patterns). The particular block used in this quilt is called the "Bow Tie". Isn't it lovely? Do a Google search for this block in color. My printer ran out of ink. :D It's much more pleasing to the eye in full color. For this specific quilt pattern, I need 24 scrap strips of fabric.


These are my fabric strips. And no, they aren't solid. I think I might have only a few solid colors, but I have a different plan. I'm going to try to place them in this gradient color order after the blocks are made. That's the real reason I took the photo, so I could use it as a reference when it comes time. I think these prints will look adorable against the black color. I'm excited. All right, that's my quilting talk. Moving on again.


I helped my friend make her wedding earrings today. While we were at the bead shop, I saw the funky-fun (yes that's the technical term) Chinese lamp work beads. I had to have them. These will be adorable for summer. ...yup, another thing to look forward to (other than summer). By the way, I have to mention here that we got a half an inch of snow last night. GRR! That's just crazy. It's April. Not only that, but I'm SO done with winter here in Minnesota. It's just getting too long. I better stop complaining there. I want this to be a happy blog! :) I want to write about things that make me happy! 


Guess I'll close now. LOL. OH WAIT! I have one more thing to say. I saw a Kenmore Ultra Mini on Craig's List for $25 last Thursday. This machine has excellent reviews. It's made by Jamome, so it's good, of course. It's a 3/4 size machine weighing in at 11 pounds, but it has a full size motor in it. That means it has power! I want it. They sell for $100 at Sears. I contacted the seller to let him know that I was interested in buying it. He had to leave town and plans to call at the beginning of next week. My fingers are crossed though, because a person never knows how these things turn out. I tried getting a different machine once, and they never responded to my email. At any rate, you better believe that I'll mention whether I get the machine or not in my next post.

Until then, keep pushing forward through your projects!

4/3/11

Beginning Butterfly Trail

Happy Sunday everyone! I'm so sorry that I missed my usual Monday entry, but busy-ness took over. I'm still trying to get my gym visits into routine so I can manage to get all my tasks done during my allotted week. I subbed again last week so my health took priority over my crafting. It turned out all right because I had quilting group on Saturday. I was able to get some cutting and sewing in. Well, I got some cutting in at the group and then I came home to sew a little.

I picked up a new pattern for a table runner since I didn't do well with the Simplicity pattern. This Piece Tree pattern looked easy enough and I consider myself a beginner when it comes to quilting. It is such an art! One of the gals at my group, Mary, was hand quilting. I liked it a lot. Quilters are so creative! The actual stitching reminded me of the embroidery work that I've done. The embroidery work is very satisfying, so I'm considering hand quilting one of my quilts - probably not my king size (Haha) - maybe on this table runner.

Okay, so moving on. Here is the Piece Tree pattern for my new table runner. It looks pretty basic and interesting. With the choice of fabrics, it could be marvelous!


These are my cuts. This is all that is required to put the table runner top together. The backing and batting isn't pictured so I'll need those too. I think I'll use the black for the backing since the black strips are my border.


I'll sew some more of the blocks together today. I should be able to blog again on Tuesday so you can see my blocks. (I go to the gym Tuesday evenings, so I have a time slot open between shifts.)

This next photo is of me wearing my scarf. It was 50° yesterday so I didn't need a jacket, but the scarf was nice in the AM. Sorry it's blurry, I didn't want to go into a big photo shoot with my mom during quilting. Sort of a slouch too - I'll work on that next time! :)


Well, the table runner project is off and running. This one will be finished before I start another. Actually, I think my next project is going to be to finish my king size quilt. I'll close with that. I'd like to get started on my day so I can get some seams in. :)

Enjoy the rest of your weekend and I'll see you next week!

3/14/11

Floating Beads, Scarves, Art Doll, and a Cute Quilted Tote!

Happy Mid-March! I'm a bit later in posting my entry this week because I've had a small life-change that needed to take place. Can you guess? Can you guess with all of my complaining about weight gain? Tawnya has joined the gym! I couldn't take it anymore. After I learned that my insurance pays a percentage of it, there was no reason to NOT join. I joined Friday and have gone each day since. I know, 4 days, big deal right? It really IS a big deal though - I've recommitted to a healthier lifestyle. So that's why I'm later today.

Now on to my crafting! My girlfriend, Korrina, is getting married this summer and asked me to help her make her bridesmaid's jewelry: earrings and necklaces. We did that this weekend. I haven't made a necklace that gives the illusion of floating beads around the neck but I've always wanted to. It was a lot of fun figuring out! Korrina was very pleased with how the pieces turned out. She has other craft ideas for her wedding and I've offered to help do whatever I can. 


I had some time to work on my art doll. I was stuck on her shoes and finally decided to go with a blue cotton with lace trim and sequins for buttons. After I got the shoes completed, I got creative and finished her lace sleeves with some blue lace trim and gave her a blue bow-tie necklace.


Here's a close up of her shoes.


And here is a close up of her sleeve trim and bow necklace.


I said that I was going to post my colorful scarf last week, but I didn't want to pose quite yet. I will mention that I have worn this scarf several times and received some really nice compliments. I'm not gonna lie, I was slightly worried that I looked like a clown! Haha... Women just loved it! They mentioned it looked so fun. (Thank you!!)


And because I loved the frilly or ruffly look of the scarf, I decided to make one out of this really pretty white yarn that my ma gave to me. It's a very soft 100% acrylic with tinsel woven through so that it reflects light and looks sparkly at a glance. I'm a sucker for sparkles. :)


Maybe you can see the tinsel a little better here.


I also had some time this week to work on some quilt squares of my own design. I debated if I should continue making random quilt squares and make another quilt blanket, but I decided not too considering my king size quilt isn't even finished yet! I DO, however, need another tote that is a small size for carrying things to the gym in. :) (I love mentioning that I "go to the gym"!) Anyways, the photo below is one side of the tote.


Here is the other side of the tote. I'm not sure how I am going to do the handles yet. Time and creativity will tell.


Well, as you see, I have three projects to finish. I don't think I will start any new ones this week. I'm taking my ma's cats for two weeks, beginning Thursday, so I am not sure how much time I will get for projects this weekend. I have a gym date this weekend too, with a gal from work - she's invited me to Zumba session. Since it's so popular, I thought I'd give it a try. Although, I'm terrible at keeping tempo or anything that requires memory to movements. :D So again, I don't know how much crafting I will get to.

Okay, my Sweety is in the kitchen ready for dinner...waiting for me. Have a great week everyone. Thanks for reading! :)

3/7/11

Pillowcase Cuties!

Hello. To those of you who've been looking for me, I'm finally here! I've decided to implement a new routine. A fitness routine. After my AM shift. It will leave less time for crafting on the days I do not sub, but, such is life. My health and fitness is just as important, if not more.

Last week, I subbed only once, but I had meetings to attend on other days, so that ate up craft time also. Good thing I had a quilting group to go to on Saturday. I was determined to get something finished, no matter how small. I learned how to make pillow cases! Some of the gals at the group told me what to do step-by-step (thanks Sue and Mary!). They are quite easy to make and the technique I used to apply the band hides all seams. It's so neat. I can't wait to make more. (Oh my gosh, now after I said that I realize a photo of the inside would have been neat to post. Normally I would take a snapshot "now" but I'm having issues with my card reader. Sorry. I'll make a note of it to put it on next week.) My first photo is the pillowcase I sewed at the group. It's for Lancelot, our Corgi. Well, Lance's doggy bed.


Here's a close up of the fabrics. They don't match quite perfectly, but I liked the large print with the small print. The case is going to be on the floor and under the dog so I wasn't concerned with how fashionable it was. :)


Here's the pillowcase I made at home on Sunday after church. I sewed a welt in this one. Again, the colors don't match the best because it's for the other doggy, Chubahka.


Here's a close up of the fabric choices. The welt is the lavender strip.


Moving beyond this... I've almost completed my colorful scarf. As soon as I get off the computer (and some other small daily living tasks), I plan to finish it. I have a few stitches left. Then I'd like to model it for the blog, though I'm not the biggest "ham". I'll post that next week also.

I should get this posted. I'm fading quickly after my workout. I usually need a little rest in the midday anyway. I hope everyone has a great week!

See you next Monday. :)

2/14/11

Cloth Diaper, Booties, Amiguruami Turtle

Happy Valentines Day everyone! I hope you're seeing hearts everywhere... :) I got a Valentine from a little girl at work that said she was glad to see me again. I'd worked with her at a different site in the district. I thought that was too cute. Valentines is a great day for kids to practice edifying one another. I like it.

Moving on to crafts and such! (Sorry, no Valentine projects.) Last week I mentioned that I sewed up an adorable item - well, the item was this cloth diaper. I had to put some hook and loop tape on it before I could photograph it. I used a diaper cover pattern for this cloth diaper so it's a tad large for a newborn. It's a decent enough prototype. I'll have to experiment and cut the pattern down.  The pattern is nice for older babies. Like everything I do, I need to tweak it for its purpose.


Next, I sewed up this make up bag. I had the idea to apply a cute gingham ribbon before installing the zipper. I've had this project sitting in my sewing room for several months now. Isn't this fabric so colorful and fun? This fabric reminds me of spring and fall. Make up bags are easy, but I sure procrastinated on it. Typical behavior for Tawnya. I'd fail as a true wizardess. :)


Moving on to crochet... If you look back at my previous entry, you'll read that I really was uninterested in crocheting this week. I really want to stay with my plan to switch my hobbies up every week so I don't get bored and to stay up to date with my projects. I started out small. I found a pattern in one of the last crochet magazines - Baby Booties! They are adorable and cozy, but THEY DON'T MATCH! I asked my ma to come over and help me with the pattern. I did just fine on the bootie I stitched up while she was here, but the second one got a little funky. She'd mentioned getting a new pattern, so I thought I'd do the same. Maybe I'll try that next month.After I get a pattern down, I thought they'd be cute to sell at WizardGir1.


Anyways, I kept on crocheting. I found this amiguruami turtle pattern on one of the yarn websites and wanted to give it a go. It was really fun stitching up. The instructions directed that the feet be sewed on after the body is stuffed, so that's what I did. However, (get ready for a little story here) while I was sewing them on, FIONA swiped one off the sofa and scooped it right up. She brought it to her secret room in the basement. You know the one? The room that cats store everything in which they steal. Yeah. that's the one. I thought it was gone forever, but then I had an idea to wait it out. Twenty minutes later I went down the basement stairs and there the turtle foot lay on the last step. Fiona had come through for her wonderful master! :) Good Kitty.


After I finished the turtle, I grew excited to begin a new project. I have been eye-balling this wonderfully colored yarn for about two months. I finally decided to throw it into my cart. It's called "bikini". I know, it's a dumb name. It's a dumb name just like the bag pattern from Janome. It was also called a "bikini bag." Whatever. But the color isn't less exciting because it has a pathetic name! It's so fun! I'm looking forward to wearing this scarf on cold spring and fall days.


Along with my colorful yarn, I threw in some acrylic beads that I intend to use for making children's jewelry. This next week is my jewelry making week. Woohoo! I'm looking forward to that one. My friend says making things for children is a must because they enjoy the smallest treasures. I'm also going to try to make time to finish the colorful scarf too. I welcome you all back next Monday to see how far I've come on the scarf, if I haven't finished it.

Until then... Happy Week!