So I left last week's entry talking about my art doll. I've finished her apron and part of her sleeves. She is turning out so beautiful! I purchased a small strip of decorative trim that I might put around her wrist or neck - I haven't decided yet. The trim is really cool colors: gold, blue, & pink. I also need to find an arm band for her lace sleeves. I might try and be creative - make something on the Elna serger, if I can round up some time. :) Aren't the bows on her arms too cute! Before I started this doll, I didn't understand why it would be considered an "art doll". I now understand. Each piece is so important to the overall design. A lot of time goes into making decisions as well as the construction. Goodness, just wait until I paint her face!
During sewing club, we learned how to make this cute little "bikini bag". (It's a dumb name.) Our instructor pulled the directions off of the Janome website, if anyone is interested. This item was made for my friend, so it won't be at the WizardGir1 shop. I made one similar, however. I need to put the drawstring on it yet. I used brocade and a cotton fabric that has a woven design in it - much like a table cloth. The patterns complimented each other well, so I went with it. That bag will be listed at the shop.
I had a little more time to sew last night (while my Sweetie watched the game). The item I made needs some top-stitching before it's revealed. It's adorable though!
This week is my crochet week, but to say the truth, I'm not really into it - yet. I've hit a point where I just want to be at home and make things. I don't want to have to shop for items to finish projects. I need to purchase some items for the crochet projects on my current list. But, by using my creative problem solving skills, I'll come up with a clever project. ;) ...if there is nothing crocheted, I'll have my other sewing project ready to share!
With that said, I'll be back next Monday. Have a great week everyone!
Oh, happy February to everyone! Yes, I am a day early but that's okay. Could it possibly mean that I am on top of things lately? Of course it's thanks to the new planner I purchased on October 25th, 2010. How do I know the exact date? My planner says "Buy Planner" on that date. I just wanted to write something in, so that was it. :)
Well, I said that I would have clay creations to share this week, but I didn't have time to complete the projects (maybe I'm not so "on top of it!"). I've varnished both sides of these pendants and earrings, but I have to hang them up in order to varnish the sides. Here's what I have so far. These pieces will be strung with beads or wire.
This next one is mine. :D I'm not selling it... It's very pretty with the cherry tree embossing and the platinum metallic powder to enhance it. I will make several more in different shapes and then sell those.
This black pendant and earrings emboss pattern remind me of snake or turtle skin. I used a pretty piece of lace for the embossing and these are the results. It turned out wonderfully.
Here are some fun copper earrings that I made with the Wigjig. I really enjoy working with wire as a medium and plan to further my education and skill. I made each component of these earrings - aside from the beads.
Sun shaped chandelier earrings with Swarovski crystals.
Pale Pink crystal earrings.
I even made time to crochet this past week! Here is a Primrose pot holder. It's slightly different from the dishcloth: this has 5 petals and the dishcloth has 6.
Of course I wanted to make more of these little baby-changing helpers too. They fold nicely for a drawer or could hang near the baby changing station.
More pee pee tee-pees in a different theme - teddies.
This is a project that I am not going to sell, but will if I it is requested. I work with children who have special needs. Many of them are drawn to certain fabrics or objects that create a specific sensation in their hand or against their cheek. I made this textile sampler so different fabrics could be removed easily with a snap.
Last of all, a charming, soft, blue baby afghan! I did not make this one. My mom crocheted this and it's for sale here. I've always admired her shell pattern stitches - they are PERFECT! This afghan has a double ruffle and finished with a blue ribbon. The acrylic yarn is spongy soft and welcomes a sleeping, snuggly baby.
I am going to try hard to stay on my craft rotating schedule in order to keep up with the latest techniques in each hobby area. Last week was polymer clay and this week is sewing. I actually pulled my art doll out and worked a little more on her. I finally purchased some lace! She has so much detail to work out and after adding a detail, I come up with another idea. ...I'm NOT complaining!
I've invited my ma over for another craft day, which I think I will be sewing either my Flying Geese table runner, or my gorgeous art doll. (I really hope I'll be able to part with her when I'm finished. The intent was to sell her, but I'm falling in love!) More photos next week!
Hey I made it back here before my week was up! I'm doing great. :) The reason why I am blogging on a Monday instead of Tuesday is this: I am subbing so much lately that Tuesdays usually end up being my 10.5 hour day. I was called last minute to sub today, but I had to turn it down. I NEED to get some stuff done around the house and, of course, my BLOG!
So last week was a crazy week for me, but I did manage to get a little sewing in this weekend. One of my new friends at my monthly sewing club brought in a project she made to class: Pee Pee Teepees to put on the wee one when he's getting changed! LOL They were too cute! When I got online to search for the pattern I came across a couple sites that demonstrated them with a ribbon and thought it was a good idea. The ribbon will serve as a nice handle to avoid touching the soaked teepee.
I made two different ones. I made one backwards, as the flannel is on the outside, but it'll still do the job. One could turn it inside out if they wanted to badly enough. I'm looking forward to getting some infant themed fabric to make some more. I plan on listing these at the WizardGir1 shop.
Moving on... Today after work, I had realized that I didn't have my cell phone. I noticed this when I was pulling out of the bank. I pulled over and looked under my car seats and rechecked my purse. I drove all the way back to work and still didn't find it. When I was leaving the school building, I stopped in to talk with the secretary and let her know that if someone should find it and drop it off that it was mine. Well, she pointed to her counter and there it was! Geez, I was relieved. I don't remember ever "losing" my phone like that.
After I got my phone I made a stop at the fabric and craft store! I picked out my lace for the art doll I am making. I think it's going to look beautiful. And I'm so excited because I purchased some new tools to work with my clay. I'll be trying them out this week and, of course, I'll post my little creations!
I've decided that because I have so many hobbies, I'll have to rotate them on a weekly schedule so I can stay fresh in them. For example, this week is clay (soon to expand into metal clay). Then it will be sewing, then crochet, then jewelry making, etc. I love learning about all of these and this is my lastest idea to help keep me sane AND productive. :) So next week I should have an entry on my clay creations. If I get more done, great. If not, at least I'm being productive. OH! I almost forgot to mention that I cut some triangles for the "Flying Geese" table runner I'm working on too this past weekend. It's slow going, but that's because I'm frustrated with the pattern instructions. Ick. I already have a new table runner pattern chosen for my next one.
Okay, if my plan works out nicely, my next post will be next Monday and all about my clay crafting. With each passing day, my life becomes a little more organized and I can breathe a little deeper. :)
Holiday greetings everyone! So the holidays are coming up and I've been subbing more in the school district. What does that mean for my craft life? It's getting squished - but it's not gone! Attending sewing clubs and groups keeps me motivated to get at least one item finished per month. I like to blog each week so that's another motivation.
So this week, I worked on two more wallets. This time I added a trim to the flap. I used white and cream trim and I like them both the same. I still would like to put my "WizardGir1" logo tag inside. I think I'll have to hand sew them in.
And to keep myself away from food after dinner, I've picked up my crochet hook each night. I'm planning to crochet every night for the rest of my life. :) Okay, it's cool and I want to become really good at the craft. So I have to practice. If I am not crocheting, my other option is knitting or the treadmill! :)
These are coasters for my mother in law. I have no idea if she uses them, but I know she likes crocheted stuff. She crochets too, so I don't know if she'll like them that much. I'll find out.
We had a ton of snow come over the Twin Cities and the Minneapolis Metro dome caved in and then finally collapsed. We drove down to look at it before it collapsed. No photos of that, but I did see other things that were snapshot worthy! I thought the spare tire of this SUV was too cute to pass up. Click on the image if you can't see it that well.
Getting right into town.. there is this big brick guy on the rooftop. It's on the same block of the Utrecht art supplier that I shop at, so I see him at each visit. Isn't he just cute!?
Look how high the snow is! People were crawling over the mounds of snow all over the place. The snow doesn't seem to slow us down! The Old Spaghetti Factory is the best place to eat with it's fun ambiance. It has old cathedral stained glass windows inside. These are gigantic!
I thought this structure was neat to look at. I first noticed the heart pattern and then it drew my eye down the length of it. Some of the patterns look tribal to me. This is by the dome, btw.
That's it for me today. It wasn't too elaborate of an article, but I promised myself I would do this once a week. I have had an itch to play with Sculpey polymer clay so that's what I'm going to do. Of coarse I'll take photos to share. The dishes can wait! :)
Okay, it's been a week and do I have a treat for you! Well, maybe the treat is more for me, but I think you'll like it, maybe not as much. Sooo, I finished my Victorian Ruffled Afghan! Woohoo! And here's a little story.
I didn't want to complete the entire 4" ruffle around the squares because I thought it would take away from the look I wanted. I wanted a smaller ruffle, just an added softness. So here is a photo of that.
Now ON TO SEWING! This blog entry is really about ruffles and gathers. The afghan had them and now my doll's clothes has them - all over the place! All right, let me interject something here...
So, I'm broke. I'm always broke. Even when I have money, I'm broke. I don't like spending money frivolously. This isn't a bad thing - I've come to realize. It really pushes me to be more creative. I wouldn't classify myself as a lazy person; I'm efficient. My point to this interjection is that if I can get a ruffle for my dress without spending the time it takes to run to the store, match up the fabrics, pay the money and then come home again, I will. I creatively made this ruffle for my doll dress!
First, I sewed 3" wide strips of fabric that equalled the length of two yards. I finished the raw edge of the maroon fabric with my serger, but this can be done with the zigzag stitch and look quite decorative. A cording foot could also be used to finish the edge in a cute fashion. I used crochet thread in my lower looper to achieve the look in the following photo. Then I ran the fabric through my ruffler foot.
Here's a video on how to make a ruffle using the ruffler foot. (I know how everyone likes videos and my last one went over quite nicely! Thanks for watching. Hopefully is was entertaining at the very least. I'll also add the Ruffler Foot video to the "videos" tab.) I purchased my foot from the local fabric store - it wasn't a special order and if you have a 40% off coupon, use it!) I feel a tad awkward making a video but I hope you can follow it with ease. I am not a ham. :)
After I made the ruffle, I added some vintage lace. Even though the light blue color doesn't match exactly, I liked the look it gave to the skirt. I strategically pinned the ruffle and the lace to the skirt fabric so I could sew them both on at the same time. Remember, I'm efficient! :D
I carefully sewed the lace onto the skirt. I went as slow as I needed to in order to get a nice straight stitch.
This was a new method for me to gather my doll's skirt waist. I used a very long strand of crochet thread and zigzagged over it using invisible thread/nylon thread.
After I finished with the gathering cord, I firmly held the tails and eased the fabric into the gathers that I wanted. I used a doll making needle to pull the threads to the front of the doll. I plan on adding beads to the stands and tying it in a bow. I think it will look cute!
Some of you know that I've taken a little over a month to go through some rooms in my home to clean out the clutter. Well, today is the day for the Lupus Foundation to pick it up! Here's the first shipment. Among the lot is a nice vintage Christmas tree. I thought it was perfect timing and someone could have a new tree this year. It's quite nice, but I'm downsizing, cleaning out clutter and creating an easy way of life for me and my husband. Last year, I bought a short Christmas tree that sits on a table. Hopefully, I can find a table the right size to set up in front of our living room window.
Back to the doll for a quick second. I'm not too pleased with the lace I have for the doll's apron, but I might make it work. I don't know yet. I'd like to make a pair of pants soon and I might pick up some lace that I like more when I make a trip to the fabric shop. I crocheted a winter cap and I have to make a flower for it yet too. Photos of that will come soon. I wanted to finish it first. My Sweetie liked my cap so much that he requested one for Christmas! That made me feel good!
It's time for me to close. I'm going to begin my day. I've spent more time here than I intended - how efficient is that?? :P
I know that I have mentioned a couple of times that I want to get a stuffed bunny going, but my heart wasn't into it when I started it this weekend. I folded my cut pattern pieces and put them in a large plastic envelop to store it until I want to begin the bunny again.
So if my heart wasn't into the bunny, what was my heart into? A doll. But not just any doll - a cloth doll. But not just any cloth doll, not like the Sophie doll I started a year ago. The doll project I started this week is an Art Cloth Doll! My goal is to see how elaborate I can make the details. I want fine detail - makeup, jewelry, painted nails and beautiful lace trimmings! Okay, this all a goal - something for me to work towards. I think I've found my niche.
I've wanted to make an art cloth doll for over a year. I used to rent the books from the library often and just drool over the work people have put into making these! They are so cool! I've started storing the littlest scraps of neat and unusual fabrics and beads so I could decorate nicely when the time came. The time is almost here. I'm in the process of constructing the doll body. I don't have a name for her yet, but I will share it when it solidifies. Here she is in pieces.
There is quite a bit of hand sewing. I am learning to enjoy it. More detail work!
To make the elbow, you draw a thread from seam to opposite seam tightly to squish the elbow and then wrap your thread around it a few times. The floral fabric shown here is her bodice.
Her fingers have been stuffed and defined by the stitching between them. I did one of her hands by hand sewing and the other by machine. The machine worked hand turned out better. The stitching was tighter which created a fuller finger form. :) These little fingers will be painted as a finishing touch. :D
I'm using Cloth Doll Artistry to learn how to make my own art doll. If this doll is enjoyable enough for me, I just may become a "doll maker" in my spare time! :) I've asked my ma to set up another sew day with me. She's working on kitchen curtains - country house style. Hopefully I will get to work on the doll a little more this week! If not, I will make time this weekend for sure!
All right! My mom accepted the sew day invite and we stitched to our hearts content! We made Little Wallets by Valori Wells Designs. It was so much fun to put these little cuties together.
The directions on the card said to trace the patterns to make templates, so that's what I did. I used card stock for the template material.
The card stock makes a nice firm edge to trace around. We needed 2 of each pattern template.
My mom chose a beautiful holiday fabric, while I chose a pretty rose patterned fabric.
Here is an image of the layout before we sew it all together. We were instructed to sew the pockets and then turn and press them to get a nice edge in the wallet.
This is the Little Wallet after everything is sewn together!
My mom had decided to use a decorative stitch so I wanted to also. Her stitch mimicked the pine tree bristle really well. I used the same principle in choosing my decorative stitch. I used a rounded leaf.
I'm not quite sure what I will sew up next, but I do have my bunny pattern cut out for a stuffed bunny. Time has been holding me back on that project. I'm still trying to go through stuff in the house to donate it. November 30th will come up quickly now, so I want to focus on getting that done. I'm hoping to make a good dent at the very least. :) Maybe I can make time for a small sewing project. :D
★★★ Okay, I had to post this! I finished sewing the last two columns on. Now, ON TO THE BORDER!!! Laura suggested I take a shade of brown in. :) I am leaning towards that color myself.
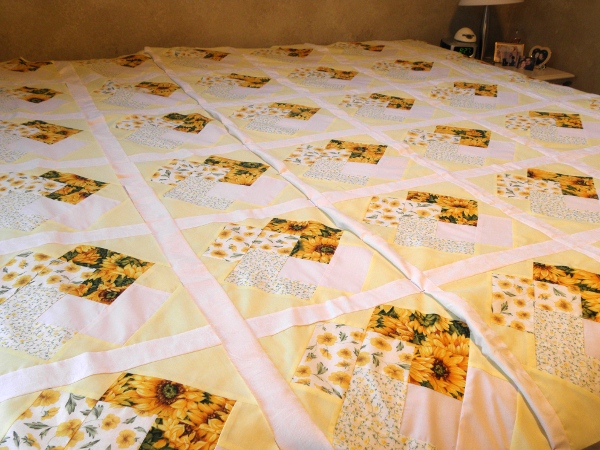
★★★ This past week I've been stitching away at my king size quilt. I am not even half-way done at this point-the point where I've left off. If you remember, I had to sew on these annoying little triangles before I could sew the lattice to the block. Here are the finished blocks with all of their yellow triangles. I wanted to lay out all the blocks so I could see my most crappy sewing and then hide it (by rearranging square layout) as best that I could.
Well after 100 triangles or so, it was time for the lattice strips. At this point, I'm beginning to see how it will come together nicely.
And this last photo is where I've left off. Argh! I have two more columns to sew together before I can begin my border. I'm starting to love it, love it, love it. It looks fancier than I intended.
I watched Sewing With Nancy today and I had an idea to pintuck my first border. To do this, I'll need a piece of border fabric twice as long as the original length. I haven't decided for sure. It's taken me 15 years to get around to this and I might just want to get it done--no more fussing! I have to buy a border fabric and I'm not sure what color to choose. I have a small pallet to choose from: yellow, white, green, and brown. I'm tired of green, but a light shade of brown might look nice. Our carpeting has brown flecks in it. :) I'll have to finish the step I am on before I can make decisions. Any suggestions?
That's all for now.
Until next week...★★★
10/27/10
★★★ I'm still learning! In my most recent sewing class, we learned how to use a 3-way cording foot to make a coaster: "Mug Rugs". They were a lot of fun to make, although it did take time. I began making a video on my Olympus but 2 seconds in to the video, the camera ran out of memory. I do plan on trying it again on the Sony video camera. Here's a photo-shot of my foot in action. Basically, you keep seaming in a square, but always seaming the entire 4 inches. We used Aqua Magic for our stabilizer; it washes away with water. It's SO COOL!
After you've completed your square, there will be loops to cut. You can see some of my loops forming in the photo above. I combed my cut loops so I could measure and trim for a more tidy look. I didn't read how short to trim it, but I thought an inch looked good. :) Here it is finished.
Moving on: The most recent project I completed is this cute organizer for my planner. (Using a planner is an old system that worked well in my past, and I've started using one again.) I wanted to apply what I learned with the cording foot to this project.
The cording is the bottom trim (sewed with a decorative stitch) and and I added another decorative stitch just to see how it looked. :) I like seeing what my machine can do!
I added a gold cord between the two fabrics, but it's hard to see. I used a regular zigzag stitch to keep that in place. I have been watching Sewing With Nancy on Twin Cities Public Television 3 days a week. This week I learned how to use my zigzag stitch as an appliqué stitch too. I attached the elastic pencil holder using that method.
I need pockets - lots of 'em! This one is for my cards.
And of course I have to have a pocket for all of my craft coupons and other notes I might need to take. And that's it! It was nice to not follow a pattern so I could use my mind to come up with design ideas. I like practicing my decorative stitches.
And yet another project: I made some place mats over the weekend too. These aren't quilted or batted. They would work well for bed night stands, especially since I made only two. :P My corners are perfect. I used a tool that is designed to give me perfect corners every time. It's called Sewing Revolution Double Mitre Ruler. Made in the USA. I learned about this ruler in my sewing class too! Thank God for my sewing class!
I think my next project will be a bunny doll. I've already started cutting out the pattern pieces for it. I saw some 5 3/4" lace trim last night at Joanne's Crafts that I might be able to incorporate into the petticoat or something. Joanne's has a crazy sale going on with items being 50% off. I should pick up that lace pronto. OH! (Changing the subject here) I saw cute tiny sequins/lills pins while I was picking out my appliqué pins. I've never used them for sequins, but I bought them so I could try it. I like the detail work. I'm going to have to get a new book now! :P
All right, I've written a "blog" day in my planner each week to help me stay on top of it. So, now I can say "Until next week..." as my closing. So...